Beauty academy

  • Spring lash shedding?

    Spring lash shedding?

    Woman upset about shedding eyelashes


    Birds are singing, daffodils are sprouting and days our getting longer.. we are ready for spring! But are our lashes? You may start to notice your clients lash retention changes this time of year, this is down to the impact the seasons have on our natural hair cycles. In preparation for Winter and the cold temperatures we hold on to much more hair, this hair is in its final ‘Telogen’ phase or resting phase as its better know, ready for shedding! As the weather starts to warm up we no longer need this retention and we start to loose hair at a fast rate, not only on our heads but our lashes too! Don’t despair there are ways in which we can manage our clients lashes to ensure a smooth transition into the spring/summer months.

    Client education

    Share with your clients what is happening to their lashes, this will ensure that they have realistic expectations for their lash retention and when they should be returning for infills! It may be worth while sharing on your social media some ‘did you know?’ statements about seasonal lash changes.

    Clients need to ensure that during this time more than ever they are cleansing their lashes, cleansing will reside the risk of impacted follicles. If follicles start to become impacted it may mean an even faster shed.

    Scheduling Infillsย 

    Ideally we would like our clients returning to us every two weeks for their infills, if they notice their lashes becoming more spare they may need to reduce the time between their treatments. We recommended that they return with at least 30% of their previous lashes still intact to get the most out of their infill service.

    What lashes shall I use?

    As we are loosing lashes at a faster rate you may notice more shorter/baby hairs start to emerge. To look after these natural lashes we recommend using shorter and lighter lashes during the spring months, this will ensure no damage to the natural lashes take place.


  • The Right Tool for the Job – Best Brushes for Acrylic, Poly Gel & UV Gel

    The Right Tool for the Job – Best Brushes for Acrylic, Poly Gel & UV Gel

    This article was first published on 18th May 2016 & was updated on 17th February 2022

    When it comes to creating the perfect nail extension, there is more to consider than simply your technique. Good technique is essential but the right tools will help you to create better results, more easily and more quickly.

    Generally speaking, as you begin to practice you will usually be using the brush that came included within the starter kit you may have purchased. We always recommend using a brush that is from within the same brand or range as the acrylic or gel products you intend to use as these have been designed and tested for best results using those specific products. However as you become more experienced and knowledgeable, you may have a preference for a different brush which works best for you and your way of working.

    Brushes for UV Gel (builder gel) Application

    No.5 flat uv gel brushTransparent Compact Size 4 Gel Brush

    UV Gel will usually require the use of a standard size 4 or 5 flat brush (for the creation of nail extensions). These are often designed for use specifically with UV Gel and are optimally shaped and sized for easy product pick up and application. These are often made with synthetic bristles to provide an easy to clean, long lasting and affordable brush which picks up the product without encouraging it to sink into the brush which could cause product wastage and make it harder to glide the product from brush to nail. Gel Polish is usually applied with the brush that came enclosed within the product lid and there is no need to use any alternative brush.

    Brushes for Poly Gel Application

    Poly Gel is a new system that has become hugely popular over the last 3-5 years as the products come packaged in an easy to dispense tube that can help to reduce product wastage and risk of cross-contamination. Your product will usually come supplied with a metal flat edged tool for ‘slicing’ some of the gel product from the tube ready for use. You then apply this ‘bead’ of sliced product direct to the prepped natural nail and work the product using a flat gel brush. Poly Gel products are applied very similarly to standard builder gel products (that come in tubs and jars) and so a standard gel application brush will be suitable, however you will need to ensure you use the ‘slip solution’ product supplied with your poly gel to avoid the product sticking to your brush. Rather than brushing the product on as you would with standard builder gels, you simply pat the bead applied to the nail into shape using your gel brush. It is important to clean your poly gel brush after use using a lint free wipe to remove excess product and soak in gel brush cleaner if required to remove any hardened product and help reshaping of your brush bristles. Always stand the brush in a cup to dry with bristles facing up to avoid the brush drying misshapen.

    Where it gets more tricky is when considering the best brush for use with acrylic products…

    Brushes for Acrylic Application

    ย Natural vs Synthetic Bristles

    Brush Anatomy Picture

    There are several factors that must be understood about brushes before you can begin to select a brush. Firstly it is important to understand why brushes for use with acrylic are usually made from kolinsky, sometimes called sable hair. Kolinsky is the hair gathered from a type of weasel found in the cold regions of Russia & China. Natural hair is used as it has an advantage of providing natural thickness towards the belly of the brush which allows it to hold liquid effectively (as in acrylic liquid). The strength and flexibility allows the brush to return to a point when wet. All hair has a structure known as the medulla which allows moisture to be absorbed. This acts as a reservoir to hold the acrylic liquid in nail brushes and releases in a controlled manner as pressure is applied with the brush by the nail technician. Kolinsky hair is far better in quality (sometimes known as golden sable) than the hair gathered from other weasels (sometimes known as red sable or just ‘sable’). If a brush states kolinsky, you can be sure you are buying the best quality brush bristles possible.

    With any natural hair brush, it is essential to maintain the brush with correct cleaning after every acrylic application to avoid the brush becoming stiff and damaged. You can purchase brand specific brush cleaners (designed to remove your specific acrylic product) and these often contain conditioners within them to keep the bristles smooth, flexible and keep the brush shape for longer. Natural brushes can be cleaned within acetone but this is not recommended as it can dry and damage the bristles over time.

    The Edge Brush Cleaner 100ml Acrylic Trial Pack

    With improved technology, some manufacturer’s are beginning to use synthetic bristles for acrylic brushes. This is also in response to those who want a ‘vegan’ option. Modern technology now allows many synthetic bristles to effectively mimic the properties of natural brushes to a degree. Synthetic bristle brushes are more durable as they are less effected by contact with the monomer (acrylic) liquid than natural hair. Many nail techs prefer natural hair however as synthetic brushes will struggle to hold the acrylic liquid as effectively. Synthetic bristle brushes are usually used more for nail art and gel application. Care must be taken when cleaning such brushes as they are often made with nylon or polyester which can be damaged if left to soak in acetone. Most brush cleaners are acetone free for use with UV Gel brushes.

    Choosing the Right Size

    When you first begin to practice your application of acrylic, you will usually make use of a smaller brush which could be a size 6 or 8. These brushes are great to begin with as they effectively lift a smaller bead of acrylic (powder with liquid) allowing you to master your application technique with the 3 zones. They also allow you to learn the ability to get your ratio of liquid to powder correct with more control. This smaller brush size of 6 or 8 is usually included within starter kits for this reason.

    No.6 Kolinsky RoundNo.8 Kolinsky Round

    However as you begin to advance in your experience and skills, you may find smaller brushes make your application slower and your treatment time longer. When working in the salon or as a mobile therapist where timing is key to ensure you can maximise your earnings, it is important that you can begin to reduce your treatment timings. One way to do so is to look to use a larger acrylic brush. Larger brushes allow you to effectively pick up a larger bead of product which means you can cover a larger area of the nail with less strokes. You will still be using your 3 zone process but will not require the use of up to 3 smaller beads to cover each zone, instead you may be able to achieve coverage of an entire zone in just one large bead. This does of course take much practice and good technique to ensure you are getting your ratio of powder to liquid correct to avoid flooding the nail or creating poor adhesion through too little powder/product too thin.

    When first starting out in nail extensions working with a smaller brush, there is a tendency to need to file the nails into shape at the end of application. This is because when you are applying numerous small beads, there can be a tendency for areas of the nail extension to become lumpy or too thick (of course some products self-settle better than others). This extra filing also increases your treatment timing. An advantage of using a larger brush is that you apply less beads and so there is less likelihood for areas of the nail extension to have thicker areas (where two beads/layers have overlapped) and less chance of the extension becoming too thick assuming you are confident with your product ratio. It is also said that reduced filing helps to create stronger, more stable nail extensions and the process is more comfortable for clients. With experience, a larger brush can enable you to create more professional looking nail extensions in less time.

    Due to the nature of having more bristles within a larger brush, this enables them to keep a better shape at the belly of the brush which also can make the larger brush easier to work with when laying down your bead onto the nail or tip. This can quite simply be seen by the fact that the larger the brush, the more structured the shape with a distinct pointed end rather when dry, rather than the more round or flatter shape of smaller brushes. It allows the brush to be more flexible and glide the bead more easily. Smaller brushes have a tendency to go much flatter with less pressure which can flatten the bead or trap it within the bristles making application more tricky.

    While working with a larger brush, it does not limit your ability to still pick up a smaller bead which you may use when infilling or rebalancing the nail as with experience you will learn to utilise the point of the brush for fine detail work. As you grow in confidence and more importantly, experience of creating the correct ratio of liquid to powder; you can begin to gradually increase the size of brush you are working with going from a 6-8 to a 10 then 12. You may even work up to a size 14 or 16 although many nail techs typically prefer working with a size 10 or 12 depending on the brand of products they are working with.

    Remember to stay working with a brush from within your product brand when working on nails for clients. When initially practising with a larger brush however you may wish to pick up an inexpensive artist’s supply brush from any stationery store or online (as these are often very similar in style but cheaper as they are unbranded). It is a great way to trial a brush size without a big spend but should not be used for client’s nails as you cannot guarantee good results as such brushes are not tested for best results with your brand of products.

    Once you have invested in a good brush, you may want to buy a brush case or cover (some brands come with a brush cap) to protect your bristles and also a brush cleaner that is recommended for use with your brush.

    Want to learn the art of Nail Extensions? We have Beginner and Advanced Courses available from only ยฃ199! Find more information at: https://new.thebeautyacademy.org/nail-treatment-cou…

  • Troubleshoot common Gel Polish issues

    Troubleshoot common Gel Polish issues

    For this weeks blog we have collated the most common issues that can arise during Gel Polish treatments. Here are our top troubleshooting tips to reduce these issues and finish with the perfectly smooth finish clients desire

    Manicurist painting a client's nails with gel polish under a UV lamp


    Shrinking Gel

    As it cures Gel shrinks, the best way to prevent this causing an issue to the final result of the treatment is to ensure that the nail edges are always capped. Capping the free edge prior to curing will reduce the risk of shrinking impacting the finished look. As Gel polish self-levels you may find that the polish starts to shrink before you cure, if this starts to happen try curing a few nails at a time to limit the time the Gel is left to shrink.


    Lifting/Peeling Gel

    There are a few steps we can take to avoid nails peeling, all starting with how we prepare the nail prior to application of Gel products.

    Always ensure that you proceed with a dry manicure prior to gel application, avoid using oil based products when completing cuticle work and avoid soaking the nails. Any moisture left of the nail could impact the longevity of the treatment. Dehydrators are ideal at reducing moisture on the nail surface.

    Lint free wipes can help to prevent micro debris from sticking underneath the gel, this will not only help with lifting but will help create a soother finish.

    When it comes to applying Gel, thinner is best. By applying thin layers and curing you allow the gel to be fully cured before the next layer. Sometimes if it is too thick it may feel touch dry but underneath the surface it may not be cured, this can lead to lifting.


    Bubbling/wrinkling Gel

    This issue can be quite common on the thumbs and one reason for this is improper curing placement. When it comes to curing try applying and curing the fingers fist and then the thumbs separately, this will allow the full coverage of the thumb within the lamp, avoiding the gel moving and wrinkling.

    Itโ€™s also important to note that lamp strength does reduce over time, if youโ€™re starting to see more bubbling or wrinkling it may be time to change the bulbs and see if that makes a difference.

    Applying the Gel in light layers will also reduce the risk of wrinkling.


  • Highly Defined Brows, Map to your clients face shape.

    Highly Defined Brows, Map to your clients face shape.


    Three face shapes with brow mapping lines

    Brow artistry has taken over the Beauty industry. Gone are the days of the simple tint and shape. With the popularity of fuller, natural looking brows treatments such as Brow Lamination and Highly Defined Brows are in high demand. There is a high level of skill needed to perform these treatments, our best piece of advice for students is to practice, practice, practice!

    Brow Mapping is the starting point for any successful brow treatment, in this weekโ€™s blog weโ€™ll be reviewing the Doโ€™s and Donโ€™ts when mapping brows inline with clients face shapes.


    ย  ย  ย  ย  ย  Round Face

    Smiling beauty professional in a pink tunic

    When mapping, create length to the face by added an arch to the brow, keeping the brow soft and slightly curved. Avoid round, flat or highly arched brows.


    Square Face

    Model with bold, defined brows and smoky eyes

    Create height in the arch of the brow. Creating a longer brow will create width to the face. Avoid Flat and round brows.


    Oval Face

    Young woman with natural red hair and brows

    Oval faces suit most brow shapes, try to keep the brow line soft. Avoid an oval brow.


    Rectangular Face

    Make-up artist shaping a client's brows

    Create a longer brow to add width to the face. Keep brows Angular. Avoid keeping the brows too close together.


    Heart Face

    Woman with natural, groomed brows

    Add height to the centre of the brow, keeping it soft and slightly curved. Avoid round and flat brows.

  • Maintaining Nails in-between treatments

    Maintaining Nails in-between treatments


    Hands with a natural manicure next to dried lavender


    This week we’re sharing our top aftercare tips for maintaining nails in-between treatments, keeping them looking fresh for longer.

    1. Avoid excessive exposure to water and heat within the first 24 hours of treatment
    2. Always use gloves when handing cleaning products, gardening or doing the washing up
    3. Limit exposure to chemicals found in common ‘Holiday’ products such as Suncream and Insect spray, wash hand throughly after application
    4. Use cuticle oil once or twice a day to maintain the hydration of the nail and surrounding skin
    5. Avoid picking or peeling gel or polish! This can damage the natural nail and affect future treatments.

    Most importantly, visit your Nail Technician every 2-3 weeks to maintain your infills.

  • Lash Mapping, where to start…

    Lash Mapping, where to start…

    Lash technician applying extensions with tweezers

    Firstly, what do we mean by lash mapping? Lash mapping is the art of dividing the lashes into sections to create a desired look using different lash lengths.ย Lash mapping is the perfect way to enhance your clientโ€™s natural eye and face shape. Itโ€™s a skill that is developed over time and like all treatments takes a while to perfect! In this blog weโ€™ll review the most common Lash looks and their maps to give your insight into the types of eyes and face shapes that would benefit from them the most.


    Classic or Naturalย 

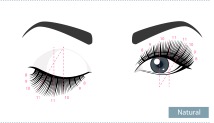
    Natural lash map diagram


    This is the style that we all start off learning, applying lashes in a 1-1 ratio. This classic technique suits clients who are looking for more of a natural look with added length. Ideal for first time clients that are new to Lash Extensions.


    Doll Eye

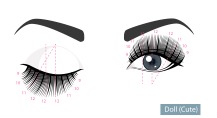
    Doll eye lash map diagram

    Ideal for opening up eyes and making them appear larger. Map shorter lashes at either corner of the eye, gradually becoming longer until you reach the longest length in the middle section. The Doll eye map is perfect for almond shape or hooded eyes.


    Cat/Fox Eye

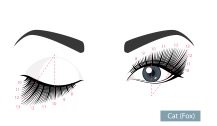
    Cat eye lash map diagram

    These maps are becoming more and more popular with clients for its ability to add some drama! Ideal for round or droopy eyes.


    Squirrel Eye

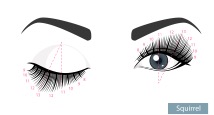
    Squirrel lash map diagram

    Squirrel can be a tricky one to start with so is reserved for the more seasoned of lash techs, as you will need more zones and lash lengths to achieve this look. ย A relatively natural looking map this is ideal for opening up clientโ€™s eye.


    The Kim K Eye

    Wispy lash set diagram

    The Kim K Eye is another map that is becoming increasingly popular with clients. This look is designed around applying longer lashes at equally distanced points along the map, this creates a fuller, fluffier look. Ideal for clients with smaller eyes and a high set brow, this map can create the illusion of larger eyes. This is another map that benefits from a lot of practice!


  • 2022 Nail trend predictions

    2022 Nail trend predictions

    Three friends in sunglasses showing their nail art


    2022 is an exciting year for the Nail industry, clients are looking to make a statement this year so now is the time to be creative, take risks and be bold! Here are the top nail trends we predict will be popular in 2022.


    Long almond nails with lilac gel polish Very Peri, Pantone colour of the year 2022


    The Colour Purple…

    When Pantone, the experts in colour communication published their 2022 colour of the year sales of lilac nail varnishes increased. Light purples are associated with light-hearted, romantic energies and is the perfect spring summer nail colour!


    White manicure with small red heart nail art


    Micro detail

    Towards the end of 2021 we started to see the rise of the micro detail, mini hearts and dainty designs are set to stick around for 2022. These details are favoured by brides, many wanting to add a little something to the standard French Mani. The key to the perfect micro mani is your brushes! Invest in some thin detail brushes to achieve the perfect set.


    Rainbow ombre French tip nails


    French with a twist

    Bold colours, swirls and waves. 2022 will bring a creative twist to our classic French manicure, so dare to be different!


    Nail art decorations with glitter and chrome nail tips Long coffin-shaped acrylic nails in pastel cream


    3D additions

    Gems, flowers, or even nail piercings. These statement additions will create the wow factor to finish any set.

  • Should I offer Holistic therapies?

    Should I offer Holistic therapies?

    Therapist pouring warm massage candle wax

    Have you ever been told that you have healing hands? As professional therapists we are in a privileged position to have a direct impact on the overall well-being of our clients. If itโ€™s your aspiration to offer your clients targeted relaxation and bespoke treatments designed to how they are feeling, then holistic treatments may be the right route for you!

    What is holistic therapy?

    Holistic or complementary therapies have been around for thousands of years, having strong links to eastern practices. The term holistic refers to treatments that not only target the body but the mind and spirit too, having an overall impact on the health and well-being of a client.

    Holistic treatments

    Many holistic therapists offer a variety of services and a lot of the treatments available can work synergistically with one another so can be combined for optimum well-being benefits.

    The most well known holistic therapies include:

    • Reiki: Connecting with the bodies chakras (energy points) to bring balance to the client.
    • Aromatherapy massage: Uses a combination of massage with the healing benefits of Aromatherapy oils that are absorbed into the skin to promote various physiological and physical benefits. These benefits include uplifting, destress and relaxation.
    • Indian Head massage: a specialised massage technique that works on pressure points to stimulate the movement of blood, lymph and oxygen in the upper body. Indian head massage also incorporates Charka work to balance the body.
    • Reflexology: Applying massage and pressure to specific zones and points on the feet to assist in bodily healing, promote well-being and diagnose ailments within the body.

    Reflexology foot treatment

    What are the financial benefits of offering holistic treatments?

    Massage therapies have a relatively low cost compared to other beauty services, the majority of what the client is paying for is your skills and time. Other benefits of offering massage therapies are that you can work for yourself, mobile, freelance or be employed within a Salon or Spa. According to Glass door the average salary of a massage therapist in the UK is ยฃ43,622.


    Where to start with Holistic treatments

    A foundation qualification to start offering holistic services would be a Level 3 VTCT in Massage Therapy, this course will cover Swedish, Aromatherapy, Indian head and Hot Stone massage techniques required to offer a variety massage treatments to your clients. Itโ€™s important to have a strong understanding of the anatomy and physiology of the body including the various body systems you will be impacting during the treatments, health and safety practices and how to preform consultations and aftercare with clients.

    Reflexology and Reiki are more specialised practices and will require you to have additional training to master these services.


  • New year, New Career.. considerations for starting a beauty business.

    New year, New Career.. considerations for starting a beauty business.


    Aesthetic practitioner in a mask with treatment equipment

    Know your niche

    What is your unique selling point?

    The Beauty industry is one of the most competitive out there, finding your niche will help you stand out from the crowd and build loyal client base. When you first start out it one of the biggest challenges can be deciding on the treatments you offer within the treatment room. Itโ€™s easy to get carried away with the excitement and end up offering too much.

    The easiest way to find your niche is to focus on the treatments that you love to perform, chances are these are the treatments you will succeed in because youโ€™re passionate about them.

    Once youโ€™ve chosen your treatments consider what makes your treatments stand out, is it your nail art? Perhaps youโ€™re a master at lash mapping or it could be the extra little touches in your customer service. Dedicate your time perfecting those treatments and marketing your unique selling points!


    Who is your target audience?

    It would be great to say everyone… however, the most successful businesses know that in order to have repeat custom you need to know the customer you are targeting. This will allow you to market your business in the correct way. For example, did you know the largest growing group on Facebook is grandparents? Consider the type of client you want coming through your door and research the best ways to advise to them. Asking those clients directly via surveys and ask what they look for from their treatments will also allow you to customise your treatments to meet those needs.


    Premises

    Are you looking to rent a salon or buy a premise, perhaps you want to work from home? Each option will have a variety of considerations. Where your business is based will determine the licences and insurance you will need to acquire. You may also consider mobile work, one consideration for this has its own implications for example setting boundaries on how far you are willing to travel.


    Costings

    The initial outlay for starting a business can soon add up. Will you require a loan to get started? Creating a business plan with a lay out of costings and a plan for paying back loans will help you keep on top of the business finances.

    Another consideration for costings is working out your pricelists, the best way to do this is to work out how much it costs you to do the service, from disposables, product usage and what your hourly rate is. ย Most professional product brands will give you an approximant usage of a product to make it easier to work costings out.


    Laws and regulations

    There are various laws and regulations impacting the beauty industry, itโ€™s important that these laws are adhered to as it may affect your insurance.

    The majority of these laws relate to health and safety practices in the workplace, such as storing products and chemicals we use. Recent GDPR laws focus more on how we process our clientโ€™s data.

    There are also new laws relating to covid-19 so it is important to regularly review the latest government policies on implementation of regulations.

    For a full breakdown visit the gov.org website.

  • Should I try coloured lashes?

    Should I try coloured lashes?

    Make those eyes POP this Christmas with coloured lashes!

    Woman with purple coloured eyelashes

    If Christmas isnโ€™t the time to try something out there than when is? Coloured lashes are becoming increasing popular for creating dramatic looks around the festive season. Here are some top tips for using colour within your lash treatmentsโ€ฆ


    1. Complement the clients natural eye colour. Complimentary colours:

    Green eyes: Layering purple lashes will intensify green eyes

    Hazel/Brown eyes: Green lashes will enhance brown eyes and make them appear bigger

    Blue eyes: Layer blue lashes with black will create a dramatic affect


    1. Allow extra time

    Adding coloured lashes is an art. Chances are you wonโ€™t be doing a full set of colour, rather using them with black to create a desired look. Itโ€™s vital to create symmetry with colour so allow an extra half an hour of treatment time to ensure youโ€™re creating the perfect set!


    1. Choosing your glue

    Black glue can create an eyeliner effect with coloured lashes, creating a more dramatic look. If youโ€™re looking for a more subtle, natural look clear glue would be best.


    1. Work with the natural lash layers

    Applying coloured lashes to the bottom layer of lashes will make them stand out the most, giving an instant pop of colour. For more of a layered subtle look apply them to the top layer of lashes or mix them in with black lashes will create more of a day look.


    Coloured purple eyelash extensions being applied with tweezers

  • Advanced Aesthetics Courses.. what you need to know!

    Advanced Aesthetics Courses.. what you need to know!

    NEW Advanced Aesthetics Courses!

    Client receiving an aesthetics microneedling treatment


    With our NEW Advanced Aesthetics Courses launching in November, now is the time to get prepared. In this blog weโ€™ll cover all of the actions to take for a successful roll out of the new treatments within your business.

    But firstly, what are the courses weโ€™re offering?

    • Dermaplaningย offers deep exfoliation removing dead skin cells, blockages, make up and vellus hair from the upper layer of the surface of the skin using a surgical scalpel to refine skin. (1/2 day training ยฃ349)
    • Microneedlingย also known as dermarolling or collagen induction therapy is administered using a dermaroller or automated pen applicator to stimulate collagen growth and repairing of skin. (1/2 day training ยฃ349)
    • Skin Peels, often known also as โ€˜chemicalโ€™ peels work using natural acids to exfoliate the skin and remove dead skin cells using specialised products applied topically to the skin. (1/2 day training ยฃ225)
    • LED Lightย Therapyย works to soothe the skin, boosting natural skin healing following more invasive treatments and is hugely rejuvenating for the skin. (1/2 day training ยฃ199)


    We will also be combining the courses into a 2 day training package. This training package combines all of ourย Advanced Aesthetics Coursesย for ยฃ1099.


    Get prepared.. Here are our top considerations for getting started with these new treatments!

    Prerequisites for study

    As the new courses are advanced treatments that can impact the skin on a molecular level, you will need to have the skills and knowledge to safely deliver these services to your clients. We will require all attendees to be experienced in delivering facial skin care at a professional level.

    There will be the following prerequisite qualifications needed to attend the courses:

    • VTCT Level 2 (or equivalent) in Facials
    • VTCT Level 3 (or equivalent) in Electrical Facials.


    Not yet qualified? No need to panic, we have reduced the cost of these courses by ยฃ400 until the 28th October, so now is the time to book and start your journey towards becoming an Advanced Aesthetics practitioner.


    Marketing

    Now is the time to start promoting the treatments to your clients. Your current Facial clients are the ideal place to start, these treatments will also attract new clients more interested in instant results! Below are a few ways to get started with promoting the new treatments.

    Existing Facial clients:

    • Send out e-blast messages sharing the benefits of the new treatments
    • Hold a launch event, offer mini treatment tasters and demonstrations, these could be themed around the festive season or โ€˜new year new youโ€™
    • Run an introductory offer for your loyal clients
    • Change your answering phone message to highlight โ€˜what’s newโ€™
    • Link to your retail products as a way of maintaining their skin and increasing retail/treatment sales, i.e. โ€˜book a course of treatments and receive a free miniโ€™s kitโ€™


    Target potential new clients:

    • Grow your social media presence, videos tend to receive more interaction than photos. Why not vlog your training journey?
    • Connect with local businesses, do you have a local bridal shop? Hairdressers? Why not team up to promote each others business, you could throw in a treatment to sweeten the deal!


    Preparing your and your clientโ€™s skin for the treatments

    These advanced treatments will have more of a targeted effect on the skin, treating more progressive skin challenges such as acne, ageing and hyperpigmentation. With this in mind you can start preparing your skin ready for treatments. The healthier the skin is prior to treatment the better the result and faster healing time post treatment.


    • Hydration is important

    Increasing skin hydration with richer moisturisers, adding serums and facial oils into a skin routine and using water/oil based facial masks 2-3 times a week.


    • Build up the skins tolerance level

    We wouldnโ€™t advise going straight into a chemical peel if you have never exfoliated the skin, with this in mind slowly building up your skins tolerance levels to chemical exfoliation will yield the best results. Lactic acid is a great ingredient as it also improves hydration. Avoid exfoliating at home 48hrs before your treatment


    • Retinol (Vitamin A)

    Retinol is a fantastic ingredient for skin conditions and complements these advanced treatments, but avoid using it 48hrs before.


    • SPF

    Ensure you have at least an SPF30 for everyday use following your treatment. Physical (sometimes referred to as mineral) SPF products are more tolerated by exposed skins following treatment.


    • Avoid using sunbeds and tanning before and after your treatments

    ย 

    ย 

    We hope you are as excited as we are to welcome you on these courses!


  • Adding a touch of Lagom to your treatment room

    Adding a touch of Lagom to your treatment room


    Cup of coffee on a cosy knitted blanket


    The over recent years we have fallen in love with Scandinavian design and way of living. Hygge took the world by storm and made us all consider ways of slowing down and embrace a cosier approach to life.

    Flash forward to 2021 and now (fingers and toes crossed) weโ€™re starting to emerge from the Covid-19 pandemic there is a new scandi trend surfacing, step aside Hygge itโ€™s time for Lagom.

    what is Lagom?

    Lagom is a Swedish philosophy which roughly translates to โ€œnot too much, not too little.โ€ Any Lagom definition will describe this concept as being all about balance.

    To inject some Lagom into your treatment space, there are some key areas to consider.

    1. Create a calm and balanced environment with colourAs colour has been proven to affect mood, it can be one of the most important choices we consider when choosing dรฉcor for our treatment rooms. When it comes to Scandinavian design, less is often more with neutral pallets being favoured. Cool greys and off whites make a great backdrop for increasing relaxation. Blue has been shown to increase feelings of calm and bliss.

      Neutral white textured background

    2. DeclutterA change in season gives us the perfect time to assess our treatment space and make some changes. Bring it back to that main goal of feeling balanced. Walk into your treatment room with fresh eyes and consider what needs to stay and what can be put away. With clients having less โ€˜stuffโ€™ to focus on they will have the headspace to relax and unwind into their treatment.
    3. Increase the green

      Plants not only add to the aesthetics of a room but have exceptional health benefits. Increasing oxygen, lowering anxiety and stress are just some of the properties of indoor plants.

      Monstera plant in a white pot

    4. LightingWith the autumn nightโ€™s drawing in, considering ways to increase natural lighting can help create an airy, calming feel. Using mirrors to reflect light into darker spaces will help to open up a room. Minimalised dรฉcor items such as candle holders and candles will add a touch of warmth to the room whilst increasing relaxation.

      Candles in a calm, neutral room